
TL;DR
Moving your rig into a closet can dramatically reduce noise and reflections, provided you manage heat and sound leakage. Proper placement and layered acoustic treatment turn small spaces into surprisingly good sound environments.
Ever wondered if your tiny closet could double as a professional-sounding vocal booth or a quiet workspace? It can. But the secret isn’t just slapping foam on the walls. It’s about understanding how sound moves, where it bounces, and how to control heat and noise at the same time. You can learn more about acoustic dampening and placement strategies.
This guide reveals the real game-changer: placement. You’ll learn how moving your rig into a closet—if done right—can cut noise to whisper levels, making your room a sanctuary for focus or creativity. For more tips, see our supportbreakfast.com site about kitchen and workspace setups. Plus, we’ll tackle common pitfalls like heat buildup and echoes, so your setup stays cool and clear.
Acoustic dampening
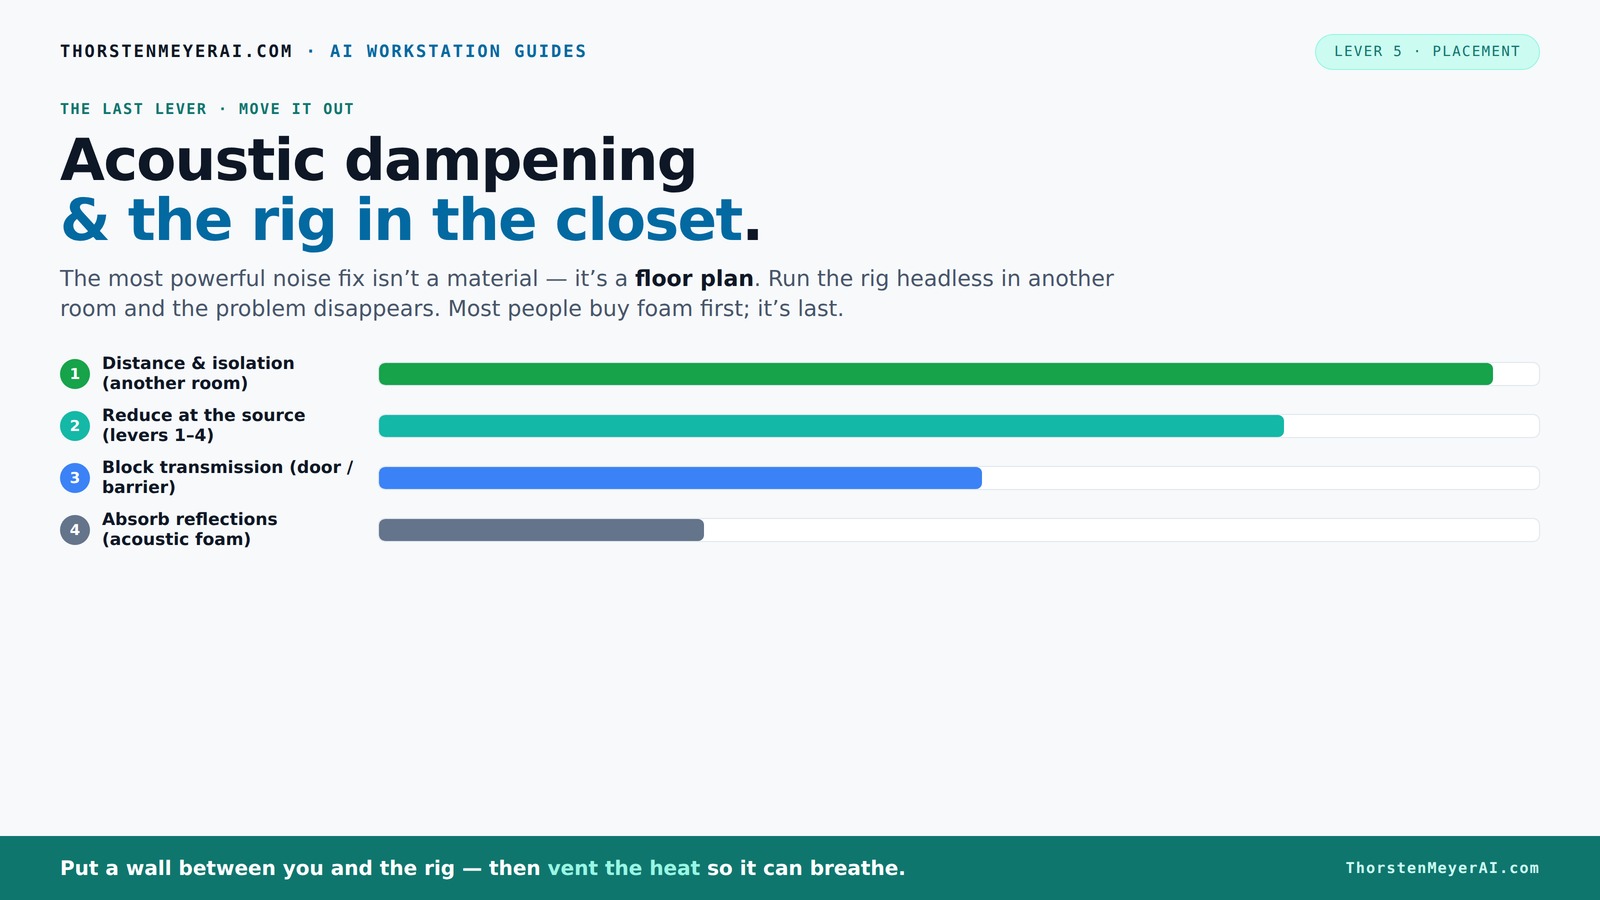
& the rig in the closet.
The most powerful noise fix isn’t a material — it’s a floor plan. A rig you can’t hear because it’s in another room beats any amount of foam. Tap the approaches in Part 1 to see what actually works.
(another room)
(levers 1–4)
(door / barrier)
(acoustic foam)
Contain the noise, not the heat
Key Takeaways
- Moving your rig into a different room or closet can eliminate most noise issues before treatment.
- Proper ventilation is critical in closet setups to prevent heat buildup and hardware throttling.
- Identify reflection points and cover them first—behind the mic, ceiling, and near reflective surfaces.
- Corners and low frequencies demand bass traps for a balanced, clear sound.
- Sealing gaps around the door dramatically improves soundproofing, keeping noise where it belongs.

Focusound 52 Pack Acoustic Foam Panels 1" x 12" x 12" Sound Proof Foam Panles Soundproofing Noise Cancelling Wedge Panels for Home Office Recoding Studio with 300PCS Double-Side Adhesive
Soundproofing - Acoustic foam panels triangular grooves structure for better noise absorption, helps to reduce and absorb unwanted...
As an affiliate, we earn on qualifying purchases.
As an affiliate, we earn on qualifying purchases.
Why Moving Your Rig Is the Most Effective Noise Solution
When it comes to quieting your workspace, distance beats foam every time. Think of your rig as a roaring lion—if you hide it behind a wall or in a different room, the roar is muffled or gone entirely. This is especially true for AI workstations, which can produce noise loud enough to disturb an entire apartment.
For example, placing a powerful GPU rig in a basement or closet lets you control noise without sacrificing performance. You SSH in, and the machine does its thing, while your desk stays silent and calm. According to experts, this simple move reduces noise transmission more than any foam panel or bass trap could.
Why does this matter? Because sound waves diminish with distance, and physical separation reduces the amount of noise that reaches your ears or neighbors. The tradeoff, however, is that this setup requires good ventilation and heat management, or else your hardware could overheat, which leads to throttling and potential damage. So, while moving your rig away from your workspace is highly effective, it demands careful planning to balance noise reduction with hardware safety.

Portable Recording Booth for Home Studio, Soundproof Vocal Booth with Travel Bag for Voiceovers, Podcasts, Streaming and Music Recording
【Superior Sound Isolation for Clean Takes】: Durable oxford fabric with multi-layer acoustic pads helps absorb up to 90%...
As an affiliate, we earn on qualifying purchases.
As an affiliate, we earn on qualifying purchases.
The "Rig in the Closet" Setup — How to Do It Right Without Cooking Your Hardware
Placing a hot, high-power machine in a closet sounds perfect—quiet and out of sight. But heat is the enemy here. Sealed spaces trap hot air, making temperatures soar and throttling your machine’s performance. If your GPU hits 85°C or higher, it’ll start throttling, and fans will scream louder to compensate.
To prevent overheating, you need good ventilation. This can mean passive vents, ducted airflow, or even an active exhaust fan. For a true soundproof closet, look for specialized enclosures with built-in cooling and noise damping. They combine acoustic foam lining with temperature-controlled fans to keep your rig cool and quiet simultaneously. For more insights, visit theculinarygene.com about balancing performance and safety in confined spaces.
Tradeoffs exist: increasing ventilation can compromise the soundproofing, while sealing too tightly can cause heat buildup. The key is layered solutions—using soundproofing materials combined with active cooling. This way, you can keep your hardware cool without sacrificing silence, but it requires careful planning and sometimes custom solutions to get the best of both worlds.

VEVOR Sound Dampening Blanket, 96" x 80", Extra Large Studio Grommeted Blanket with Grommets, Light Blocker for Door Acoustic Noise Blocking Blanket Studio Sound Absorption Sheet, Black
Wrap It Up in a Snap: Wrap it all up in our massive 96" x 80" sound dampening...
As an affiliate, we earn on qualifying purchases.
As an affiliate, we earn on qualifying purchases.
Placement Matters: Where to Put Your Acoustic Treatment in a Tiny Closet
Where you put your acoustic treatment can make a huge difference. Start by identifying the reflection points—behind you, behind the mic, and on the ceiling—then add absorption there first. In a small closet, echoes bounce wildly, especially off hard surfaces like shelves or the desk itself. Learn more about acoustic treatment placement for small spaces.
Why does this matter? Because reflections cause comb filtering and muddiness, which distort your sound. By placing absorptive materials at these critical points, you are effectively controlling how sound waves bounce and interfere, leading to clearer recordings and more accurate monitoring. Think of your space like a mini concert hall—every surface that reflects sound needs some softening. If you neglect these reflection points, echoes will muddy your audio, making it difficult to produce or evaluate sound accurately. Therefore, strategic placement of treatments ensures you’re tackling the primary sources of problematic reflections, resulting in a more controlled acoustic environment.
Pro tip: Cover as much as possible. More absorption, especially in small rooms, means less echo and clearer audio. Use a mix of foam panels, blankets, and rugs tailored to the problem areas.

Amantech 12 Pack Acoustic Panels Self Adhesive Sound Proof Foam, High Density Sound Acoustic Panel, 16X12X0.4 Inch 4:3 Rectangle Panels in Home, Office, Reccording Room, Studio,and more(Beige)
【EFFICIENT NOISE REDUCTION】If you work or live in a noisy environment, then Amantech acoustic material will bring great...
As an affiliate, we earn on qualifying purchases.
As an affiliate, we earn on qualifying purchases.
Corners and Low Frequencies: Why Bass Traps Are a Must-Have
Small rooms are notorious for low-frequency issues—boomy bass and standing waves that create uneven sound. Corners are the trouble spots, trapping bass and amplifying it. This can lead to a muddy, boomy sound that makes mixing difficult and recordings less clear. Discover how to effectively use bass traps in small rooms.
Why does this matter? Because low frequencies have longer wavelengths, they tend to reflect and accumulate in corners, creating peaks and nulls that distort your perception of sound. Bass traps placed in these corners absorb these problematic wavelengths, smoothing out the low-end response. Without them, your recordings may have a muddy or exaggerated bass response, making mixing a challenge. Proper placement of bass traps reduces these low-frequency anomalies, leading to more accurate sound reproduction. This results in recordings that translate better across different systems and a more balanced listening environment. Investing in bass traps is a small step that can dramatically improve your overall sound quality, especially in confined spaces.
Sealing the Door and Gaps: The Unsung Hero of Soundproofing
Sound leaks through gaps and poorly sealed doors. Sealing your closet door with weatherstripping or acoustic seals can block 80-90% of sound escape. That’s a huge win for keeping noise inside and outside your space controlled. For more soundproofing tips, visit our guide on sealing gaps and doors.
Why does this matter? Because even tiny gaps act like soundholes, allowing noise to escape or enter. Proper sealing ensures that your soundproofing efforts are maximized, preventing sound from leaking out and reducing external noise infiltration. Adding a door sweep and weatherstripping around the edges creates a tight seal, which is often overlooked but crucial for effective soundproofing. This step doesn't require extensive modifications but can drastically improve the overall isolation. It’s the difference between a room that sounds insulated and one that still leaks noise, defeating your efforts. Treat the door like a barrier—every gap sealed enhances your soundproofing significantly.
Tradeoffs: sealing too tightly without ventilation can cause heat buildup, so consider combining sealing with ventilation strategies for a balanced setup.
Coverage Is Key: How Much Absorption Do You Really Need?
In a tiny closet, covering a large part of the surfaces with absorption materials makes a noticeable difference. Instead of just one or two panels, aim for 50-70% coverage of walls and ceiling if possible.
Why does this matter? Because sound waves bounce and reflect off hard surfaces, creating echoes and muddiness. The more surfaces you treat, the less reverb you’ll have, resulting in clearer sound and less noise escaping or bouncing back into your microphone. For example, hanging foam panels across the entire back wall and ceiling drastically reduces echoes, making your recordings tighter and more professional. Using thick blankets or quilts on walls and the door enhances absorption without breaking the bank. The key is to balance coverage with practicality—cover as much as you can within your space and budget for optimal results. More coverage means less reverb and a more controlled acoustic environment, which is especially important in small, reflective spaces.
Hard Surfaces Near the Microphone? Cover Them Up!
Hard surfaces like desks, shelves, or even a glass window can reflect sound straight into your mic. Covering or softening these surfaces with blankets, rugs, or foam reduces harsh reflections and comb filtering, which can muddy your recordings.
Why does this matter? Because every hard surface acts like a mirror—bouncing sound waves directly back into your microphone. These reflections can cause phase cancellations and muddiness, reducing clarity. Covering surfaces with soft materials absorbs these reflections, leading to a cleaner, more focused sound. For example, placing a folded blanket on your desk beneath the mic can soften the sound and reduce comb filtering, resulting in clearer recordings. Think of your space as a stage: every hard surface is a mirror, bouncing sound back at you. Softening these surfaces directs the sound where you want it—toward your microphone and away from unwanted reflections—improving your overall audio quality.
Frequently Asked Questions
Can a closet really work as a vocal booth or recording space?
Yes, a closet can work as a makeshift vocal booth if you manage reflections, seal gaps, and provide adequate ventilation. Small, reflective spaces trap sound, but with proper treatment, they can produce surprisingly good results.
Should I use acoustic foam, blankets, or bass traps?
Mix and match. Foam panels and acoustic panels address mid and high frequencies, blankets soften reflections, and bass traps control low-end buildup. The best approach is layering these materials based on your specific space and needs.
Where should I place treatment first: behind the mic, behind me, or in the corners?
Start with reflection points—behind the mic, ceiling, and hard surfaces. Then add bass traps in corners to control low frequencies. Covering these key spots makes the biggest difference in sound quality.
How much coverage do I need in a small closet?
Aim to cover 50-70% of the available surfaces with absorption materials. More coverage reduces echo and reverb, making your recordings clearer and your space quieter.
Do I need to soundproof the closet or just reduce reflections?
It depends. Reducing reflections improves sound quality inside the space, but soundproofing—sealing gaps, adding mass—stops sound from escaping. For a quiet environment, focus on both, especially the door and gaps.
Conclusion
Transforming a tiny closet into a quiet, effective workspace or vocal booth isn’t about slapping on foam. It’s about smart placement, layered treatment, and managing heat. When you treat sound sources and reflections thoughtfully, your space becomes a control room, not a reverberant echo chamber.
Remember: the most powerful noise control tool is distance. Keep your rig tucked away in a ventilated, sealed space, and your workspace will be silent, cool, and ready for serious work or perfect recordings.